7. Nod & Shuffle masks (GMOS only)
The Nod & Shuffle mode (hereafter N&S mode) and the definition of micro-shuffling and band-shuffling are described in the GMOS N&S pages. The main difference between the two is summarized as:
Band-shuffling mode: In band-shuffling mode the user controls which areas of the detector are used as storage bands for a particular mask. Storage bands (and science bands) have equal sizes. If multiple masks are created from one OT, they will all share the same band definition (see below), unless a new set of masks is created based on a different band definition. Several (many) objects with different slit lengths may be placed within one band. This is the preferred mode if a large number of (possibly very short) slits should be placed within a small area. It allows for very high slit density.
Micro-shuffling mode: In micro-shuffling mode, GMMPS picks the sources as it does for a normal mask, and blocks storage areas above and below each science spectrum. Storage bands of adjacent objects may be shared (i.e. they may overlap), and thus have different sizes. Storage bands will be different from mask to mask if several masks are created from the same OT. Only one object may be present in each science band, and the slit length must be identical for all slits.
Note
The nod amount is not part of the mask design. Nodding is a telescope offset and defined in the Observing Tool, not in GMMPS. You may either nod in the slits (increasing the observing efficiency) or nod off to sky. GMMPS will design the masks with the objects centered in the slits. If you use tilted slits, then one of the nod positions must be q=0, as otherwise the object will never be placed in the slit.
Note
Band definition files are obsolete (and unsupported) as of GMMPS v1.4.0. Nod & Shuffle parameters are stored in the ODF, and displayed when loading the ODF. Values that must be entered in the Observing Tool when defining the phase II observations are highlighted.
7.1. Setting the N&S specific parameters
Your first action when designing a Nod & Shuffle mask is to decide between micro-shuffling mode and band-shuffling mode.
7.1.1. Band-shuffling Mode

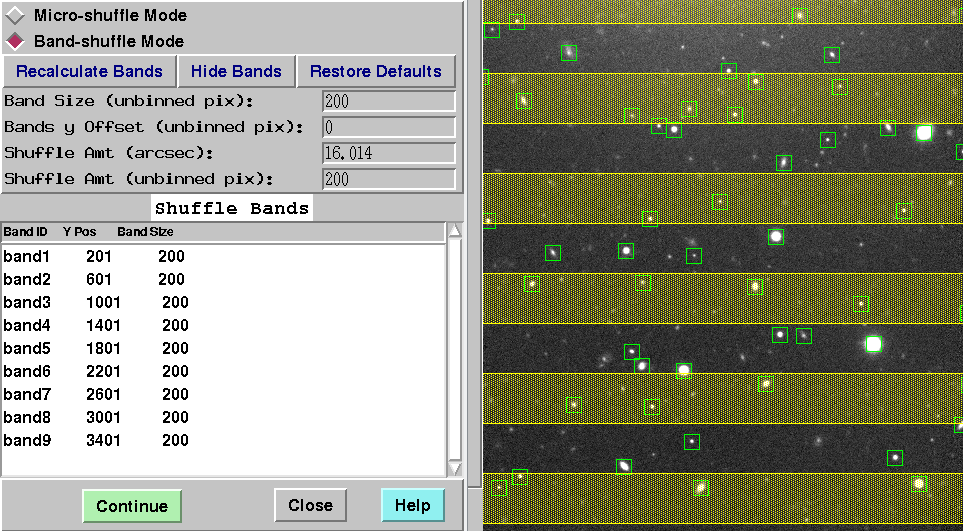
Fig. 7.1 Band-shuffling windows.: Left: N&S parameters. Right: Image window with the forbidden storage areas marked yellow. Objects in the OT table that fall in the storage areas will be removed from the mask design.
The following parameters need to be set:
Set Band Size (unbinned pix). Default gives one band of slits at the center of the array in the y-direction.
Set Shuffle amt (arcsec) or Shuffle amt (unbinned pix) to an amount greater than or equal to Band Size (unbinned pix). Changing either field will automatically update the other field. They are forced to be consistent with the band size.
Hit return or click on Recalculate Bands to see where the bands fall. The storage areas where no slits will be placed are displayed yellow (see figure above).
Adjust the offset of the bands in the Y-direction, using the Bands y Offset (unbinned pix) as needed. To see the effect, hir return or click on Recalculate Bands.
For band-shuffling mode the forbidden regions that will be used as storage areas, and where no slitlets will be placed, are marked red. To cover the full area, you need at least two different band definitions complementing each other (e.g. using different y offset settings).
7.1.2. Micro-shuffling Mode

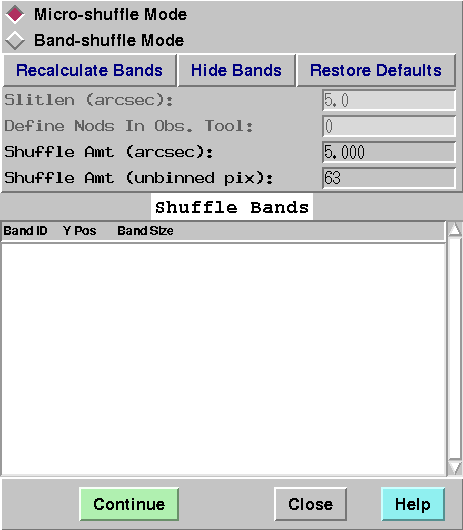
Fig. 7.2 Nod & Shuffle parameters for micro-shuffling mode
The following parameters need to be set:
Set Shuffle Amt (arcsec) or Shuffle Amt (unbinned pix) to a value greater than or equal to your slit length. These two fields will automatically update relative to one another.
In micro-shuffling mode the position of the storage bands depends on the objects that will be included during the mask design process. These areas are undetermined at this point (and, contrary to band-shuffling, not shown in the image window).
7.2. Continue with mask design
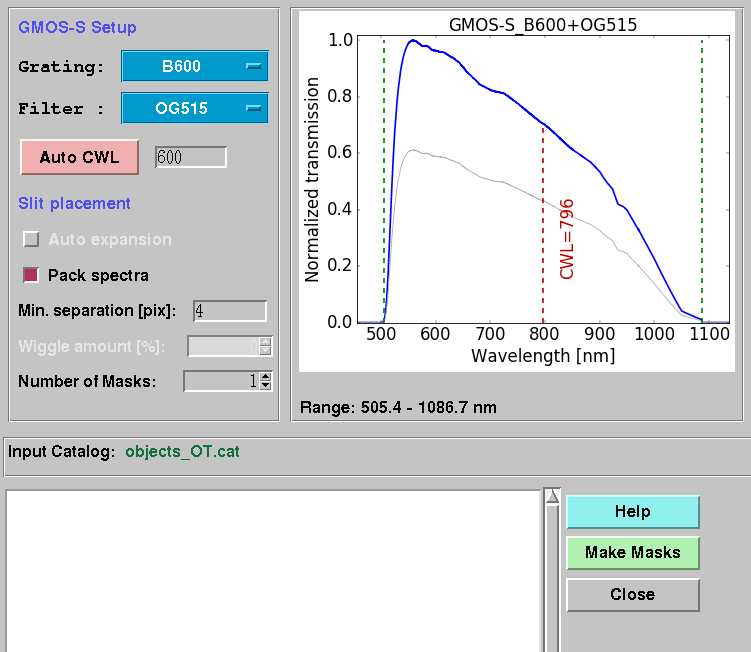
When the N&S parameters have been set, click Continue. This brings up the mask design window that allows you to select the grating, filter, and in case of GMOS, the central wavelength. From here, proceed as for other masks.

Fig. 7.3 Mask design window for a Nod & Shuffle mask (micro-shuffling). The auto expansion and wiggle amount parameters are deactivated in this mode, because slits must have the same lengths, and objects must be located at identical positions in the slit (otherwise some of them might be driven off the slit by a nod offset). All other settings are identical as for normal masks.
